Flag
🔙 Blog

Modifying OpenWrt based TP-Link firmware to gain root shell access

#TP-Link #Archer_C6 #router #qualcomm #qsdk #OpenWrt

This post is quite a bit different than the other ones on this blog as my hobbies shifted a bit lately and I'm focusing more on thinkering with cheap devices I get my hands onto to unlock (most of) their full potential so this will be more of a "how-to" post.

âš  Mandatory read the recovery info if you intend to do anything in this guide.

Patching dropbear

My Setup

I know for sure that it can be greatly simplified and I might update this but for now this what worked for me.

On Ubuntu 22:

  1. Clone the tplink-safeloader repo and build the tools
    git clone https://git.openwrt.org/project/firmware-utils.git
    cd firmware-utils
    cmake .
    make tplink-safeloader
    
  2. Download and extract the .bin from the latest TP-Link firmware (or the same version that you have on your router and want to keep using) in the current directory, preferably rename it to stock.bin then use tplink-safeloader to extract the kernel and rootfs:
    mkdir ./extract
    ./tplink-safeloader -x ./stock.bin -d ./extract
    cp ./extract/os-image ./kernel
    cp ./extract/file-system ./rootfs.squashfs
    file ./rootfs.squashfs
    
    Note the version of squashfs being used, the compression and also important the block size. In my case:
    ./rootfs.squashfs: Squashfs filesystem, little endian, version 4.0, xz compressed, 
    6846118 bytes, 1634 inodes, blocksize: 1048576 bytes, created: Mon Jun 13 10:00:18 2022
  3. Copy rootfs.squashfs to the Ubuntu 14 machine

On Ubuntu 14:

As a normal user:
  1. Download the GPL code release from TP-Link's website, archived here.
  2. Extract the archive and build mksquashfs4 and unsquashfs
    cd ./C6V2_EU_GPL/openwrt/
    make tools/squashfs4/compile V=s
    
    make will try to download source dependencies (xz-5.0.4 and squashfs4.2) from the internet. If it won't be able to do so because of, let's say, expired certificates you can manually download the files above and put them in the dl/ directory under openwrt/ then try building again.
    At the end of a successful build you should see something like:
    make[3]: Leaving directory `/home/ub14/C6V2_EU_GPL/openwrt/build_dir/host/squashfs4.2/squashfs-tools'
    touch /home/ub14/C6V2_EU_GPL/openwrt/build_dir/host/squashfs4.2/.built
    make[2]: Leaving directory `/home/ub14/C6V2_EU_GPL/openwrt/tools/squashfs4'
    make[2]: Entering directory `/home/ub14/C6V2_EU_GPL/openwrt/tools/squashfs4'
    install -m0755 /home/ub14/C6V2_EU_GPL/openwrt/build_dir/host/squashfs4.2/squashfs-tools/mksquashfs /home/ub14/C6V2_EU_GPL/openwrt/staging_dir/host/bin/mksquashfs4
    install -m0755 /home/ub14/C6V2_EU_GPL/openwrt/build_dir/host/squashfs4.2/squashfs-tools/unsquashfs /home/ub14/C6V2_EU_GPL/openwrt/staging_dir/host/bin/unsquashfs4
    mkdir -p /home/ub14/C6V2_EU_GPL/openwrt/staging_dir/host/stamp
    touch /home/ub14/C6V2_EU_GPL/openwrt/staging_dir/host/stamp/.squashfs4_installed
    make[2]: Leaving directory `/home/ub14/C6V2_EU_GPL/openwrt/tools/squashfs4'
    make[1]: Leaving directory `/home/ub14/C6V2_EU_GPL/openwrt'
    Take note of the install lines as that's where your binaries are:
    /home/ub14/C6V2_EU_GPL/openwrt/staging_dir/host/bin/mksquashfs4
    /home/ub14/C6V2_EU_GPL/openwrt/staging_dir/host/bin/unsquashfs4
  3. You should now switch to root with sudo su
  4. Go into the directory where you transferred your rootfs into and unsquash it.
    cd /home/ub14/mod/ 
    /home/ub14/C6V2_EU_GPL/openwrt/staging_dir/host/bin/unsquashfs4 ./rootfs.squashfs
    
    Expected output:
    Parallel unsquashfs: Using 8 processors
    1485 inodes (1485 blocks) to write
    
    [===========================================|] 1485/1485 100%
    created 1231 files
    created 149 directories
    created 254 symlinks
    created 0 devices
    created 0 fifos
    
  5. Download and install the original dropbear from OpenWrt:
    wget https://archive.openwrt.org/attitude_adjustment/12.09/ar71xx/generic/packages/dropbear_2011.54-2_ar71xx.ipk
    tar -xzvf ./dropbear_2011.54-2_ar71xx.ipk
    cp ./data.tar.gz ./squashfs-root/
    cd ./squashfs-root/
    tar -xzvf ./data.tar.gz
    rm ./data.tar.gz
    
    Expected output:
    ./
    ./usr/
    ./usr/sbin/
    ./usr/sbin/dropbear
    ./usr/lib/
    ./usr/lib/opkg/
    ./usr/lib/opkg/info/
    ./usr/bin/
    ./usr/bin/ssh
    ./usr/bin/scp
    ./usr/bin/dbclient
    ./usr/bin/dropbearkey
    ./etc/
    ./etc/config/
    ./etc/config/dropbear
    ./etc/dropbear/
    ./etc/dropbear/dropbear_rsa_host_key
    ./etc/dropbear/dropbear_dss_host_key
    ./etc/init.d/
    ./etc/init.d/dropbear
    
    Note how we overwrote the init and config for dropbear since TP-Link has a custom version of it in which they disable a lot of stuff.
  6. Insert these uci configs into the router's crontab. If you intend to restore the router config from before the patch leave them in there at least until after you restore everything or else you won't be able to login after restoring:
    nano ./etc/crontabs/root
    * * * * * /bin/sh -c "sleep 15 && test ! -f /tmp/mod_ok && uci set dropbear.dropbear.RootPasswordAuth=on && uci set dropbear.dropbear.SysAccountLogin=on && uci set dropbear.dropbear.PasswordAuth=on && uci commit && touch /tmp/mod_ok"
    
  7. Generate a root password:
    openssl passwd -1 toor
    
    Example output (you can actually use this hash, the password is the same as above:
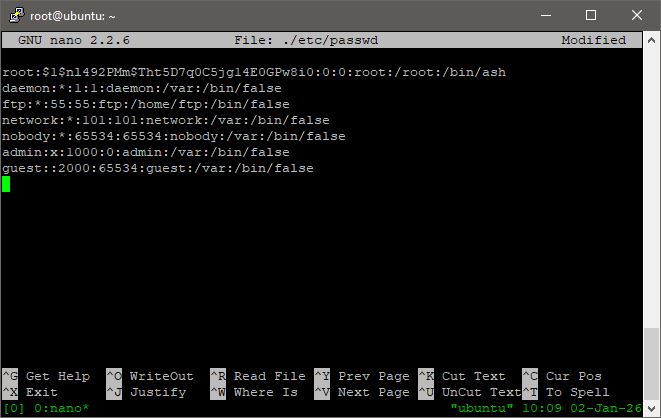
 toor ).
    $1$nl492PMm$Tht5D7q0C5jg14E0GPw8i0
    
  8. Hardcode it in ./etc/passwd (we can and will change this after our first login):
    nano ./etc/passwd
    Replace the x in the entry for the root user with the output obtained previously so it looks like this:
  9. [Optional]: Make some storage space into the partition.
    Since we modified binaries and added more content into files, we likely need to make some storage space to flash this back into the router. The amount needed (if needed at all) varies by model but for Archer C6 v2 I needed to make some space.
    My best recommandation would be to head into ./www/ and look for some assets to remove. For this patch just remove the onemesh example gif since it's quite big (84Kb):
    rm ./www/webpages/themes/green/img/mesh/onemesh-network.1655114411095.gif
  10. Pack the directory back into a squashfs:
    cd ..
    /home/ub14/C6V2_EU_GPL/openwrt/staging_dir/host/bin/mksquashfs4 ./squashfs-root rootfs2.squashfs -nopad -noappend -root-owned -comp xz -Xpreset 9 -Xe -Xlc 0 -Xlp 2 -Xpb 2 -b 1048576
    
    Example output:
    Parallel mksquashfs: Using 8 processors
    Creating 4.0 filesystem on rootfs2.squashfs, block size 1048576.
    [===============================================================/] 1230/1230 100%
    Exportable Squashfs 4.0 filesystem, xz compressed, data block size 1048576
            compressed data, compressed metadata, compressed fragments, no xattrs
            duplicates are removed
    Filesystem size 6606.33 Kbytes (6.45 Mbytes)
            27.86% of uncompressed filesystem size (23708.60 Kbytes)
    Inode table size 14058 bytes (13.73 Kbytes)
            25.95% of uncompressed inode table size (54174 bytes)
    Directory table size 17762 bytes (17.35 Kbytes)
            50.46% of uncompressed directory table size (35203 bytes)
    Number of duplicate files found 6
    Number of inodes 1633
    Number of files 1230
    Number of fragments 21
    Number of symbolic links  254
    Number of device nodes 0
    Number of fifo nodes 0
    Number of socket nodes 0
    Number of directories 149
    Number of ids (unique uids + gids) 1
    Number of uids 1
            root (0)
    Number of gids 1
            root (0)
    
    âš  Make sure that you use the same block size and compression algorithm as the original otherwise you will either get bigger filesystems that don't fit into the router's flash or the kernel will fail to mount the fs and boot.
    In such a case, you will have to do a tftp reflash.
  11. Move the newly created rootfs2.squashfs onto the Ubuntu 22 machine

Back on Ubuntu 22:

  1. Move rootfs2.squashfs into the same directory where you have tplink-safeloader compiled in.
  2. Repack the binary:
    ./tplink-safeloader -B ARCHER-C6-V2 -k ./kernel -r ./rootfs2.squashfs -o outv1.bin
    âš  You should not get any console output on success.
    âš  If you get a file-system partition too big (more than 6788096 bytes): Success it means that you didn't make enough storage space in Step 9. As it is today, tplink-safeloader is smart enough so it doesn't build any binary with a filesystem too big so there's no file output.
    Go back to Step 9 and look for more files you can remove. Make sure you didn't accidentally forget to remove data.tar.gz from the root directory. You can likely merge the english and japanese language locale JS (don't remove them entirely or the login webui may break) or you could remove some more web assets like images, maybe try to minify some html pages. It really depends on how much space you need.
    Preferably, before you remove anything, check that you used the same block size and not a smaller one.
  3. Log into the router's webui, go to the Firmware Upgrade section and flash the repacked version.

Login via ssh

After the first boot, wait for ~20 seconds after the webui loads and try to login via ssh as root:toor.If you're logging in via PuTTY you don't need to do anything besides accepting the warning. If you login via the terminal from a linux host you likely need to add -o HostkeyAlgorithms=+ssh-rsa -o KexAlgorithms=+diffie-hellman-group14-sha1 to the connection command like this:
ssh -o HostkeyAlgorithms=+ssh-rsa -o KexAlgorithms=+diffie-hellman-group14-sha1 root@192.168.0.1
Also note that the key will change after every reboot because...TP-Link?

âš  If you get Permission denied and can't login via ssh, try factory resetting the router either from the webui or by holding the reset pin to force it to load your passwd file.
After your first login (and after you restored your settings) you can change the root password normally via passwd and edit the crontab via crontab -e.
You can now experiment with different settings, remove any trace of "cloud" and run scripts directly on your router. A good starting point would be uci show to see the entire config.

Recovery

From the featured article from OpenWrt community.

Before anything happens, I strongly recommend familiarizing yourself with the recovery steps. To check if your binary is actually accepted by tftp you can try to follow the steps below before having actual trouble. If it works your router should factory reset and go back to it's original firmware version, if it doesn't accept it, it will just reboot into the current firmware with all the settings.

If while patching something gets messed up and you can't login to the webui anymore or the router doesn't boot anymore, you need to do a full reflash via tftp. Make sure you downloaded the first version of firmware for your router or another tftp accepted build if you use another model. My router only accepts the first ever software build (ArcherC6v2_eu-up-ver1-0-1-P1[20180627-rel42764].bin). Finding this file is pretty challenging as TP-Link hides all but the latest 3 versions so I linked it there, archived here.
The steps are the same as the ones in the OpenWrt guide:
  1. Extract the .bin from the zip above
  2. Move and rename the file to ArcherC6v2_tp_recovery.bin in your tftp's server root directory
  3. Set your machine's ip address to 192.168.0.66 and (optionally, personally I didn't need to) ethernet rate to 100mbps, plugged into LAN1
  4. Power off the router.
  5. Hold the reset button with a pin and power it on.
  6. When the wps LED turns on release the pin and observe the tftp download. The router will reboot into the firmware in about 2-3 mins
âš  If after 5-6 minutes the router still isn't doing anything and you saw a download happen, it has refused the firmware file. You can likely turn it off and try again after checking that firmware file is the correct one and setting the speed.
âš  Do NOT flash other regions firmware via tftp, you may brick uboot and the tftp recovery.

How long did it take?

The effort was spent over ~3 days and I worked 2-4h in each day.
A lot of time was spend over documenting and familiarizing myself with the firmware, trying to compile the GPL release of the firmware from TP-Link's website or figuring out why stuff wasn't working and shifting my focus from one target to another as at first I didn't have a very clear path or target in mind. Also tftp reflashing a lot :))
In total there have been around 20-25 builds.